Ever wanted your shared folders to feel like they’re right on your own PC? Map network drive in Win11 makes this possible. Instead of constantly browsing your network, mapped drives appear in File Explorer just like C:\ or D:\. Whether it’s for work, school, or home storage, this guide walks you through every step with practical tips, security advice, and troubleshooting.
Step-by-Step Guide to Map Network Drive in Win11
Before You Start — Must-Check
- Ensure both devices are on the same network (LAN or VPN).
- Set your network profile to Private (Settings → Network & Internet → Properties).
- Turn on Network discovery and File & printer sharing (Advanced sharing settings).
- Make sure you have proper permissions for the shared folder.
- SMB2/3 is recommended; avoid SMBv1 for security reasons.
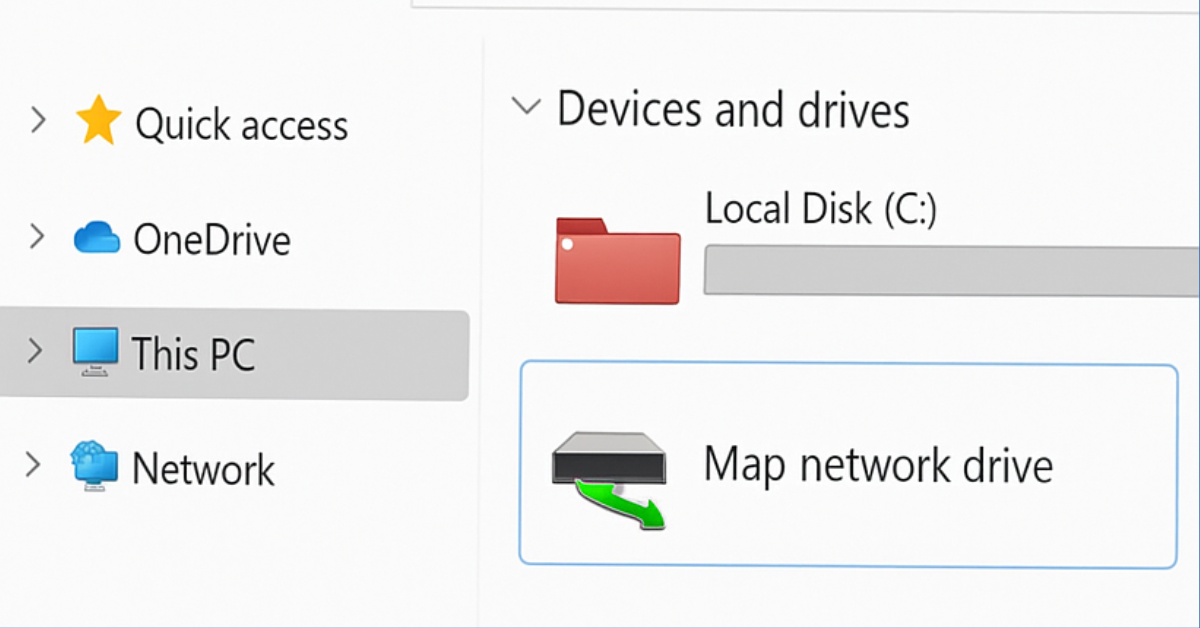
Method 1: Using File Explorer (Easiest)
- Press Windows + E to open File Explorer.
- Click This PC in the left pane.
- Select the Map network drive on the toolbar.
- Pick a drive letter (Z:, Y:, etc.).
- Enter the network path:
\\ServerName\SharedFolderor\\192.168.1.10\Public. - Check Reconnect at sign-in if you want it to stay mapped.
- Optional: Check Connect using different credentials if needed.
- Click Finish and enter credentials if prompted.
💡 Tip: If you face credential issues, check Control Panel → Credential Manager → Windows Credentials.
Method 2: Command Prompt (Quick & Scriptable)
Open Command Prompt and run:
net use Z: \\ServerName\Share /persistent:yes
To include credentials:
net use Z: \\ServerName\Share /user:SERVER\username password /persistent:yes
- List mappings:
net use - Remove mapping:
net use Z: /delete
⚠️ Avoid storing passwords in scripts; use Credential Manager instead.
Method 3: PowerShell (Modern Approach)
Open PowerShell and type:
# Map drive with interactive credential prompt
New-PSDrive -Name "Z" -PSProvider FileSystem -Root "\\ServerName\Share" -Persist -Credential (Get-Credential)

# Remove mapped drive
Remove-PSDrive -Name "Z" -Force
-Persist ensures visibility in File Explorer and persistence after reboot.
Troubleshooting & Common Problems
- Network path not found: Ping the server or try the IP address.
- Access denied/repeated credentials: Check share permissions and saved credentials.
- Mapping doesn’t reconnect: Ensure Reconnect at sign-in is checked; consider the EnableLinkedConnections registry fix.
- Drive letter in use: Pick a different letter or disconnect the conflicting drive.
- SMB errors: Ensure server/NAS supports SMB2/3; avoid SMBv1.
Security Considerations
- Avoid SMBv1; it’s insecure.
- Limit share permissions to only necessary users/groups.
- Use Credential Manager instead of storing passwords in plain text.
- For remote access, always use a secure VPN.
Quick Cheat-Sheet
# Map drive (CMD)
net use Z: \\192.168.1.10\Public /persistent:yes

# Remove drive
net use Z: /delete

# Map drive (PowerShell)
New-PSDrive -Name "Z" -PSProvider FileSystem -Root "\\ServerName\Share" -Persist -Credential (Get-Credential)

# List mapped drives
net use
FAQ
Q: Why can’t I see other computers on the network?
A: Ensure Network Discovery is on, the network is Private, and the other PCs are powered on.
Q: It asks for credentials every time — how to stop that?
A: Store credentials in Credential Manager → Windows Credentials.
Q: How to map a drive for all users?
A: Use a logon script or scheduled task per user; global mapping is less secure.
Q: Does mapping give server access to my files?
A: No. Only users with permission on the server can access files.
Q: Can I map cloud shares like OneDrive?
A: Use OneDrive sync app; WebDAV mapping is possible but less reliable.
Q: How to stop a mapped drive from reconnecting?
A: Right-click the drive → Disconnect, or run net use Z: /delete.
Latest Post
- Windows 11 ISO 64 Bit Download – Official Direct Link
- How to Choose a Laptop in 2026: Honest Step-by-Step Guide
- BSOD Error: What Is Blue Screen of Death and How to Fix It?
- Rufus Software: What It Is, How It Works & Why You Should Use It
- Shortcut Key for Screen Recording in Windows 10 (Complete Guide)
![]()